9. Collateral Management
Centralized Asset Management or Collateral Management System (CMS) enables the user to record a new collateral, evaluate it, and re-evaluate the existing collateral.
A Collateral Management System is used to minimize the frauds which involve the same collateral being pledged for different Lease and re-evaluating existing collateral manually or connecting to the VIN Interface.
The Collateral Details screen is opened from the Servicing > Servicing > Collateral Management and contains the following tab:
- Collateral
- Search
9.1 Collateral Tab
Using the Collateral screen, you can record a new collateral, view the valuation of collateral, and re-evaluate the existing collateral.
The collateral details can also be defined in the collateral screen of Application Entry screen.
The system assigns collateral statuses and the following are the statuses:
- Undefined- When the collateral is created for the first time.
- New- When an undefined collateral/ asset gets validated, its status is changed to New. This collateral can only be used for Substitution in Servicing.
- Inactive- When an application from released, sold or inventory status is attached to application it becomes Inactive.
- Active- When the application gets funded, inactive collateral gets associated with the account in Servicing and gets activated. The status of the collateral then becomes 'Active'.
- Released- The Lease collateral can move to "Released" when the collateral is no more attached to any account.
- Substituted- When collateral with the status active is replaced with different collateral, the active status is changed to substituted.
To enter the Collateral Details
- On the application master screen, click Servicing
> Servicing > Collateral Management > Collateral
Details.
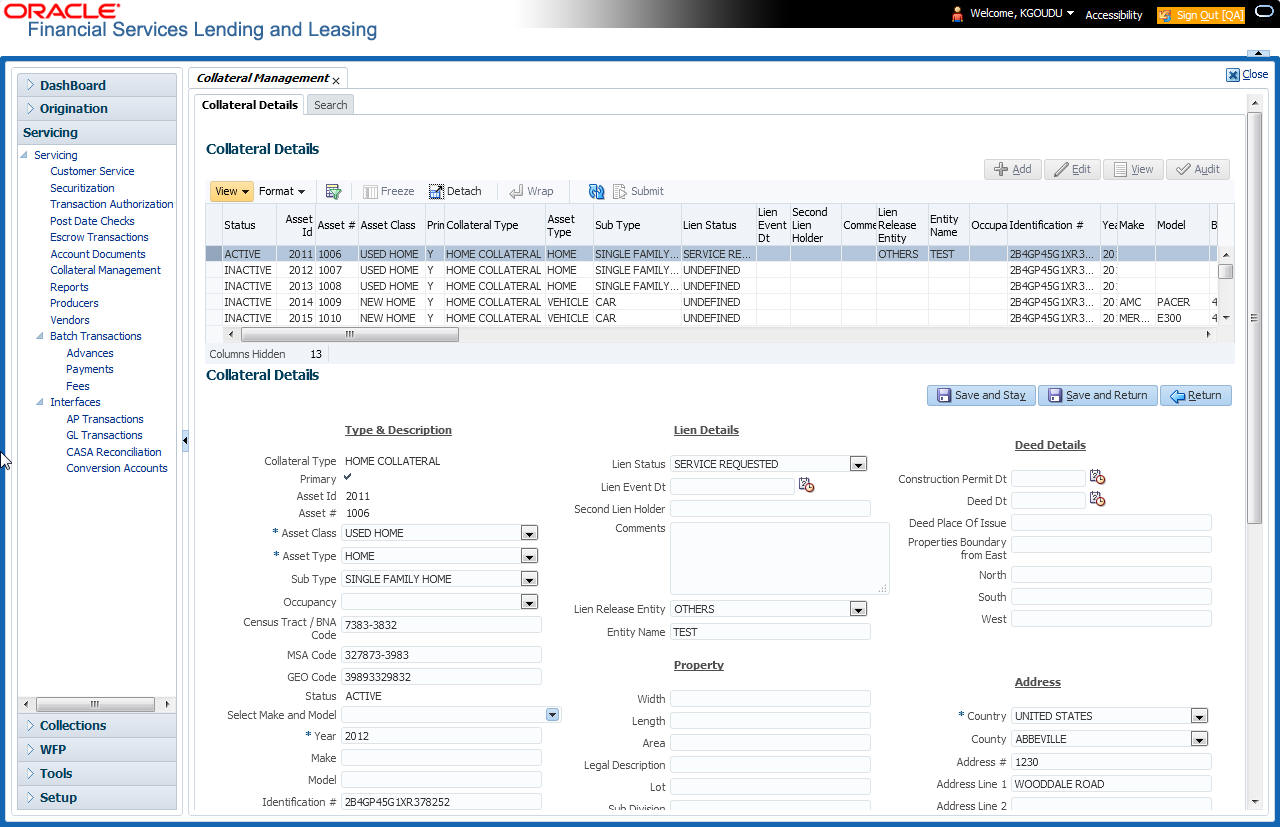
- In this section, you can perform any of the Basic Operations mentioned in Navigation chapter.
A brief description of the fields is given below:
Field: |
Do this: |
Type and Description section |
|
Collateral Type |
Select the collateral type. |
Primary |
Select the check box if this property is the primary collateral. |
Asset ID |
View the asset identification number. |
Asset # |
View the asset number which is automatically generated. |
Asset Class |
Select the asset Class. |
Asset Type |
Select the asset type. |
Sub Type |
Select the asset sub type. |
Registration # |
Enter the vehicle registration number. |
Status |
View the vehicle status. |
Select Make and Model |
Select the Make and Model number of asset from the drop down list. You can use the search option to select the details. |
Year |
Specify the year of the vehicle. |
Make |
Specify the make of the vehicle. |
Model |
Specify the model of the vehicle. |
Identification # |
Specify the vehicle identification number. |
Body |
Specify the body of the vehicle. |
Description |
Specify the description of the asset. |
Condition |
Select the condition of the asset from drop-down list. |
Lien Details |
|
Lien Status |
Select the type of Lien action. |
Lien Event Dt |
Select the lien event date from the calendar. |
Second Lien Holder |
Specify the name of second lien holder. |
Comments |
Specify additional details if any. |
Lien Release Entity |
Select the lien release entity from the drop-down list. The list displays the following values: - Customer - Producer - Others |
Entity Name |
If you have selected the lien release entity as ‘Customer’ or ‘Producer’, system automatically filters entity name list with corresponding customer accounts or producers. Select the required entity name from the drop-down list. If you have selected the lien release entity as ‘Others’ specify the entity name. |
Usage Details |
|
Start |
Enter the Initial kilometers of vehicle Usage. |
Base |
Enter the Base kilometers of vehicle Usage. |
Extra |
Enter the Extra kilometers of Usage Purchased. |
Total |
Enter the Total kilometers of vehicle Usage. |
Address section |
|
Country |
Select the country. |
County |
Select the county. |
Address # |
Specify the address number. |
Address Line 1 |
Specify the first address line. |
Address Line 2 |
Specify the second address line. |
Zip |
Select the zip code. |
Zip Extn |
Specify the zip extension. |
City |
Specify the city. |
State |
Select the state. |
- Perform any of the Basic Actions mentioned in Navigation chapter.
- Click Submit.
9.1.1 Valuations Sub Tab
The Valuation sub section contains information about the value of the asset. The Values section enables you enter the value of the asset. The Addons sub tab records information about any add ons associated with the collateral.
To complete the Valuations section
- Click Valuations section.
- In this section, you can perform any of the Basic Operations mentioned in Navigation chapter.
A brief description of the fields is given below:
Field: |
Do this: |
Valuations section |
|
Current |
Select if this is the current valuation. |
Valuation Dt |
Specify the valuation date. |
Source |
Select the valuation source. |
Edition |
Specify the valuation edition. |
Supplement |
Specify the valuation supplement. |
Total Value = |
View the total value. |
Wholesale Base |
Specify the wholesale value. |
Usage |
Specify the usage value; that is, the monetary effect that current mileage has on the value of vehicle. |
Retail Base |
Specify the retail value. |
Addons + |
View the add-ons value. |
Usage Value + |
Specify the usage. This pertains to Lease and usually is entered as the current mileage on vehicle. |
- Perform any of the Basic Actions mentioned in Navigation chapter.
- In the Addons section, you can perform any of the Basic Operations mentioned in Navigation chapter. You need to specify all the field values for every asset’s add-ons and attributes on the application.
- A brief description of the fields is given below::
Field:
Do this:
Addons/Attributes
Select the add-on/attribute.
Value
Specify the value of the attribute.
Amt
Specify the add-on amount.
- Perform any of the Basic Actions mentioned in Navigation chapter.
9.1.2 Tracking Sub Tab
The Tracking sub screen enables you to record further information associated with the collateral. What items you choose to track are setup during implementation.
To track attributes for the collateral
- Click the Tracking sub tab.
- In the Tracking Items section, click Load Details.
- In the Tracking Items section, you can perform any of the Basic Operations mentioned in Navigation chapter.
A brief description of the fields is given below:
Field: |
Do this: |
Tracking Item |
View the tracking type |
Disposition |
Select the disposition. |
Start Dt |
Specify the tracking start date. |
End Dt |
Specify the tracking end date. |
Followup Dt |
Specify the next follow-up date. |
Enabled |
Select to track the information from start date in the Start Dt field. |
Comment |
Specify any comments regarding the tracking item. |
- Complete the Tracking Item Details section by entering information about a parameter in the corresponding the Value field.
- Perform any of the Basic Actions mentioned in Navigation chapter.
9.1.3 Status History Sub Tab
The Status History sub tab enables you to view the asset history of association with accounts.
To view the Status History
- Click the Status History sub tab.
- In the Status History section, view the following information:
Field:
Do this:
Account #
View the account number.
Status
View the status of asset.
Lien Status
View lien status of the asset.
Line Event Date
View lien event date of the asset.
Data Change Status
View the data change status of the asset.
Data Change Date
View the data change date of the asset.
Comments
View comments of the asset if any.
9.1.4 Asset Relation Sub Tab
The Asset Relation sub tab enables you to view the asset relationship.
To view the Asset Relation
- Click the Asset Relation sub tab.
- In the Asset Relation section, view the following information:
Field:
Do this:
Account #
View the account number.
Asset #
View the asset number.
Status
View the asset relation status.
Current Ind
Indicates that this is the current asset.
Primary Ind
Indicates that this asset is the primary.
9.1.5 Audit Sub Tab
The Audit sub tab enables you to view the asset relationship.
To view the Audit
- Click the Audit sub tab
- In the Audit section, view the following information:
Field:
Do this:
Account Id
View the account identification number.
Asset Id
View the asset identification number.
Column Name
View the column name.
New Value
View the new value.
Old Value
View the old value.
Changed By
View the person name who changed the details.
Changed Date
View the date on when the details are changed.
9.2 Search Tab
A Search screen is available on the Collateral Management System to help locate information such as an asset type, asset number, identification number, asset status, make, model, and year. This is the information that is used on the Collateral screen.
To search for a Collateral details
- On the Oracle Financial Services Lending and Leasing Application home screen, click Servicing > Servicing > Collateral Management > Search.
- The Collateral Management screen’s Search screen
appears.

- In the Search Criteria section, use the Comparison Operator and Value columns to enter the search criteria you want to use to locate a collateral.
- Click Search. The system displays result of the search in Results screen.
- On the Results screen, select the collateral you want to load and click Submit. The system loads the collateral details on the Collateral Details screen.